- Specifications and APIs
- Application Servers and Implementations
- JBoss WildFly
- Command Line Deployment
- IntelliJ Deployment
- JSON Binding
- Bean Validation
- Beans and Scopes
- CDI
- EJBs
- Containers
- Local PostgreSQL Setup via Docker
- Registering PostgreSQL as a Data Source
- Persistence and Entities (JPA)
- Flyway Database Migrations
Java EE Theory
Java EE is a Java framework for developing server-side applications. Among other things, it allows you to:
- create web APIs by accepting incoming HTTP requests
- save and retrieve data from databases
- send and receive messages from message brokers
- connect to other backend systems via HTTP or SOAP
- package applications into single units of deployment (.war files)
The framework is very much geared towards enterprises and big corporations. As such, it often ends up being popular in the domains of banking, insurance, accounting, finance, and manufacturing.
Like the programming language Java itself, Java EE used to be owned and managed by Oracle. However, between 2017 and 2019, Oracle has transfered the ownership of the Java EE framework to the Eclipse Foundation, resulting in the framework being renamed Jakarta EE from version 8-9 onward.
| Framework Name | Version | Year of Release |
|---|---|---|
| J2EE | 1.2 | 1999 |
| J2EE | 1.3 | 2001 |
| J2EE | 1.4 | 2003 |
| Java EE | 5 | 2006 |
| Java EE | 6 | 2009 |
| Java EE | 7 | 2013 |
| Java EE | 8 | 2017 |
| Jakarta EE | 8 | 2019 |
| Jakarta EE | 9 | 2020 |
It's going to take time for the term Jakarta EE to really catch on, as the term Java EE is still very much ingrained in the corporate software industry.
We will be setting up a Java EE 8 application in the build-along section of this article.
Specifications and APIs
You should think of Java EE as a collection of recipes. Recipes for typical pieces of functionality within a server application. The technical term for a Java EE recipe is a Java Specification Request (JSR), and each JSR describes a single unit of functionality within the Java EE framework. For example:
- Creating a RESTful web API? JSR 370
- Validating incoming HTTP request bodies? JSR 380
- Connecting and reading (or writing) from a database? JSR 338
- Publishing messages to a message broker? JSR 343
This modular setup lets developers pick and choose which parts of the framework they want to use.
In an actual project, this typically means that your application has a single Maven dependency on the full Java EE API.
And what's interesting to understand, is that these Java EE API modules consist of nothing but interfaces, annotations and simple POJOs. There is no actual Java EE framework functionality in any of these API modules. The real implementation of the Java EE specifications, interfaces and annotations lies with the host environment in which your Java application(s) will be running. And such host environments are referred to as Java EE application servers, or simply (application) servers.
Application Servers and Implementations
Java EE applications can't stand on their own—they require a Java EE application server to run in, because the server provides the application with the facilities it needs to carry out its tasks.
This ties back to the story about JSRs (Java Specification Requests) from earlier. Since your application only depends on Java EE API modules, it's agnostic of the actual implementation of these modules (at least in theory 😅). It's up to the application server to provide the actual (runtime) implementations to these API modules.
The image above should make clear that Java EE application servers are to be thought of as facilitating environments, in which multiple (unrelated) Java apps from different teams or departments can simaltuneously run alongside each other, each application pseudo-isolated from its neighbours.
An application server doesn't have to implement every single Java EE specification, though. Different servers can have varying degrees of specification compliance.
For example, the Apache Tomcat server only implements the web layer of the Java EE specification and, as such, is referred to as a web server. The JBoss WildFly server, on the other hand, implements every part of the Java EE specification, and can therefore be referred to as a (Full) Java EE application server.
Below's an overview of the most popular Java EE servers.
| Application Server | Spec. Compliance |
|---|---|
| Apache Tomcat | Web-only |
| Eclipse Jetty | Web-only |
| JBoss WildFly | Full |
| IBM WebSphere | Full |
| Oracle WebLogic | Full |
| Apache TomEE | Full |
When deploying a Java EE application to some server, there will be lots of additional libraries available on the classpath at runtime. These are all implementation libraries for the different Java EE API modules which the application might depend on. So there's a big difference between compile-time API libraries and runtime implementation libraries.
For example, by having a Maven compile dependency on the (full) Java EE API library, you'll be able to decorate your classes and methods with the @Path and @GET annotations (part of JSR 370) and create a simple HTTP endpoint like this:
You should now be able to log in and click around in the management dashboard (if the server is running).
Hello World
Let's start out by creating a POM file for our new Maven project. You can either set it up from scratch, or follow this example. At the very least, the POM should have a provided dependency on the Java EE API and a compile dependency on the SLF4J API (used for logging). Additionally, I recommend including the very useful Lombok library.
Next, create a folder called src/main/webapp/ where all static resources like HTML, CSS and JavaScript files are to be placed. Add an index.html file here, containing a simple
Hello World
header element.We're almost ready to serve this HTML page - all that's left to do, is:
- whitelisting the index.html file, so it can be accessed without authentication
- configuring our application's context root - remember that multiple applications can run alongside eachother within the same application server, so some kind of server-wide unique URL namespace is needed for each application to place their HTTP endpoints under (this is the context root)
For this, we'll have to create some deployment descriptors, i.e.: XML config files with information about access management and deployment preferences.
Deployment descriptors for web applications are to be placed inside the src/main/webapp/WEB-INF/ folder. So create this folder, and add the following two files to it:
- web.xml for whitelisting the index.html file
- jboss-web.xml for configuring the application's context root
By setting the context root to /store , all of our application's HTTP endpoints will be available under http://localhost:8080/store/** . Note that you're also allowed to set the context root to / .
After deploying this minimal application to WildFly in the next section, we should be greeted with the "Hello World" H1-header when visiting http://localhost:8080/store .
Command Line Deployment
To deploy our Hello World application to WildFly, we first need to package it. This is done via the Maven WAR plugin, so simply add it to the plugins section of your POM file.
Next, run the mvn package command to generate a .war file (more on deployment artifacts later). Depending on the Maven artifact ID and version of your application ( store and 1.0.0 in my case), the .war file can be found inside the application's target/ directory as store-1.0.0.war . Make note of the exact path.
From this point, deploying our application is relatively straightforward. After making sure that the WildFly server is running via the ./standalone.sh script, simply cd into the same $JBOSS_HOME/bin/ folder from a different terminal window and execute the ./jboss-cli.sh script with the following arguments (adjust with the actual path of your .war file):

The @ApplicationPath annotation defines a common prefix for all JAX-RS HTTP endpoints within the application, but keep in mind that the context root always comes first. So static resources like index.html are served at http://localhost:8080/store/** , and JAX-RS HTTP endpoints are served at http://localhost:8080/store/api/** .
In Java EE terminology, HTTP endpoint collections are usually referred to as resources, so let's create a resources package with the following PingResource class:
After redeploying this updated application to WildFly, you'll find that refreshing the /ping endpoint now yields the exact same hash code every time, correctly indicating that there's only a single PingResource in our entire application, shared among all HTTP requests.
Java beans are a pretty interesting concept in and of themselves, but it becomes even more interesting (and much more powerful) once we learn that a Java bean can inject other beans.
CDI
CDI is an acronym for Contexts and Dependency Injection, which is another one of those Java EE APIs (JSR 365). In short, it describes some kind of mechanism where beans can have dependencies on other beans.
For example, consider the following three application-scoped beans.
To shut this local PostgreSQL instance down, press Cmd + C or Ctrl + C in the terminal window. To bring it back up, just re-run the docker-compose up command, which will start the previously created PostgreSQL instance again.
While we're at it, let's also go ahead and manually run the DDL statements for setting up our application's database schema. Later on, we'll look into a better way of doing this automatically during deployment.
Make sure the java_ee_postgres container is running, which can be checked via the docker ps command, and execute the following command to start a PostgreSQL CLI session inside the container:
Here's an overview of what these annotations mean.
- @Entity - This lets JPA (or rather: the JPA implementation library) know that this is one of those database mapping objects which it should scan and index
- @Table - This lets JPA know the name of the database table to which this entity should be mapped
- @Column - This lets JPA know the name of the database column to which this particular field should be mapped
- @Id - This lets JPA know that a field corresponds to the database table's primary key column
- @GeneratedValue - Every relational database has this feature of auto-incrementing column values, so this annotation (together with the strategy parameter) lets JPA know that, even though there's a primary key constraint on the id column, we're still allowed to have our POJO's id field set to null when saving a new account (because the database will generate the id for us)
With these annotations in place, let's turn our attention to the AccountRepository , which will be responsible for saving and retrieving these Account objects from the database.
The first thing we need to do, is inject a so-called entity manager into this repository bean. This is some kind of utility object (provided by JPA) with methods like persist to actually save a new Account object into the database. We can inject and use the entity manager as follows:
package com.jessym.store.persistence; import com.jessym.store.model.Account; import javax.ejb.Singleton; import javax.persistence.EntityManager; import javax.persistence.PersistenceContext; @Singleton public class AccountRepository @PersistenceContext(unitName = "PostgresPU") EntityManager em; public Account register(String name, String email) Account account = new Account(); account.setName(name); account.setEmail(email); em.persist(account); return account; > // . >In a nutshell, this repository:
- is marked with the @javax.ejb.Singleton scope, because it should be an EJB for our purposes
- attempts to inject an entity manager via some persistence unit named PostgresPU (more on this later)
- uses the em::persist method to save a new account object into the database (where it omits the id field, because that will be auto-generated as declared by our table definition from earlier)
- returns the Account entity, at which point the account would have been saved as a new row in the database, and at which point JPA would have set the Account POJO's id field for us, so it's no longer null
We can use the injected entity manager to connect the two remaining methods of AccountRepository ( list and findById ) to the database as well. But because JPA's criteria API (used for querying) can be a bit difficult to work with, I recommend simply copying the repository's final source code from GitHub, where you'll find a working example.
We're almost ready to connect to PostgreSQL from our Java application, because we still need to set up a persistence unit. Attempting to deploy all of the discussed changes to WildFly is likely to yield the following error:
WFLYJPA0033: Can't find a persistence unit named PostgresPU in deploymentIn order to resolve this final issue, we need to introduce one more deployment descriptor. We already have web.xml and jboss-web.xml inside src/main/webbapp/WEB-INF/ , but we also need to add a file called persistence.xml inside src/main/resources/META-INF/ with the following content:
xml version="1.0" encoding="UTF-8"?> persistence xmlns="http://java.sun.com/xml/ns/persistence" xmlns:xsi="http://www.w3.org/2001/XMLSchema-instance" xsi:schemaLocation="http://java.sun.com/xml/ns/persistence http://java.sun.com/xml/ns/persistence/persistence_1_0.xsd" version="1.0" > persistence-unit name="PostgresPU" transaction-type="JTA"> jta-data-source>java:jboss/datasources/PostgresDSjta-data-source> properties> property name="hibernate.dialect" value="org.hibernate.dialect.PostgreSQL95Dialect" /> property name="hibernate.default_schema" value="public" /> properties> persistence-unit> persistence>Most important of all, we're actually defining a PostgresPU persistence unit here, which is already being referenced by our application's AccountRepository .
Second, we're referencing the PostgresDS data source via its JNDI name (which we've set up earlier), allowing us to link it to this new PostgresPU persistence unit.
And third, we're adding some Hibernate-specific properties here.
Remember how JPA is just a specification, consisting of interfaces and annotations. The application server provides the actual runtime JPA implementation library. And in case of WildFly, the chosen JPA implementation library is called Hibernate.
By setting the vendor-specific hibernate.default_schema property to public , for example, we can reference our PostgreSQL account table from the Java Account entity as @Table(name = "account") , rather than @Table(name = "public.account") .
Keep in mind, though, that any Hibernate-specific properties would no longer be picked up if we would ever swap our JPA implementation library from Hibernate to EclipseLink (something which would never happen for a sizeable application in the real world).
And that should be it! 😁
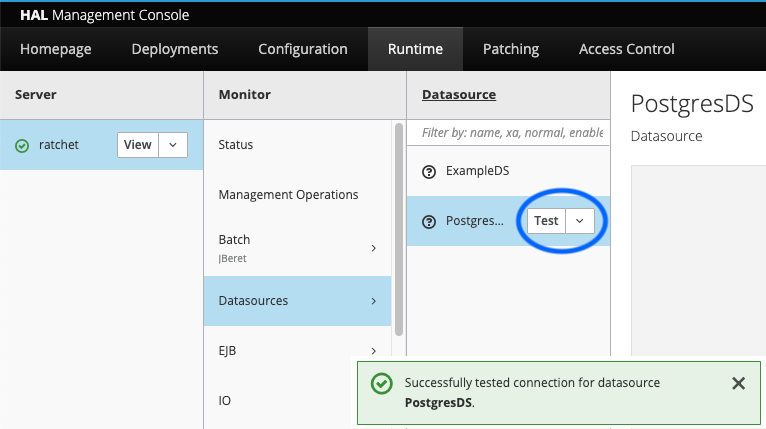
Make sure that PostgreSQL is running, and redeploy the latest version of the application to Wildfy. The AccountResource endpoints below should now be fully functional and result in the creation and querying of rows in PostgreSQL.
curl -iX POST http://localhost:8080/store/api/accounts \ -H 'Content-Type: application/json' \ -d '< "name": "jessy", "email": "jessy@example.com" >'curl -iX GET http://localhost:8080/store/api/accountscurl -iX GET http://localhost:8080/store/api/accounts/1After saving some new accounts into the database via the above registration endpoint, they should also be queryable directly via the PostgreSQL CLI client:
docker exec -it java_ee_postgres \ bash -c "PGPASSWORD='password'; psql 'user=admin dbname=postgres'"SELECT * FROM public.account;Flyway Database Migrations
We began this section about database connectivity with the setup of a local PostgreSQL instance, where we manually executed a DDL script against the database for setting up the account table.
Because this manual procedure isn't ideal, there's a great tool called Flyway which can be used to automatically execute database migration files against the database during startup. And because these database migration files are placed inside a folder within src/main/resources/ , the database schema would be part of the same version-controlled source tree as the Java EE application itself.
To get started, add a compile dependency on Flyway to the application's pom.xml file:
dependency> groupId>org.flywaydbgroupId> artifactId>flyway-coreartifactId> version>6.5.5version> dependency>Next, we're going to create an EJB with a hook for the application-startup lifecycle event. Add a class called FlywayMigrationExecutor with the following content:
package com.jessym.store.persistence.flyway; import org.flywaydb.core.Flyway; import javax.annotation.PostConstruct; import javax.annotation.Resource; import javax.ejb.Singleton; import javax.ejb.Startup; import javax.ejb.TransactionManagement; import javax.ejb.TransactionManagementType; import javax.sql.DataSource; @Startup @Singleton @TransactionManagement(TransactionManagementType.BEAN) public class FlywayMigrationExecutor @Resource(lookup = "java:jboss/datasources/PostgresDS") DataSource dataSource; @PostConstruct public void migrate() Flyway flyway = Flyway.configure() .dataSource(dataSource) .schemas("public") .load(); flyway.migrate(); > >Here's a breakdown of all the annotations we're seeing here.
- The @Startup annotation declares that this bean should be initialized eagerly (i.e.: during the application's startup sequence)
- The @Singleton annotation declares this class to be an EJB
- The @TransactionManagement annotation lets WildFly know that container transaction management should be disabled for this EJB and that it will manage its own transactions (at the BEAN level) - this is necessary for Flyway because it needs to execute SQL queries which wouldn't normally be allowed in a container-managed environment
- The @Resource annotation lets us perform a JNDI lookup for the PostgresDS data source we created earlier
- The @PostConstruct annotation instructs WildFly to execute the migrate method once the container has successfully injected all instance fields (so in this case, we can be sure that the dataSource field is no longer null by the time migrate is invoked)
Apart from these annotations, we're using the Flyway API to initialize a new Flyway object, where we're required to pass in a DataSource object, and where we can optionally pass in our default PostgreSQL schema name.
Calling flyway.migrate() will actually trigger Flyway to look for database migration files inside the src/main/resources/db/migration/ folder, and execute these against the provided data source object. So, taking into account Flyway's naming conventions for SQL migration files, let's add our first V1__create_account_table.sql migration file to this src/main/resources/db/migration/ folder:
CREATE TABLE account ( id SERIAL PRIMARY KEY, name VARCHAR, email VARCHAR UNIQUE );After deploying these changes to WildFly for the first time, you're likely to be greeted by the following error message:
org.flywaydb.core.api.FlywayException: Found non-empty schema(s) \"public\" but no schema history table. Use baseline() or set baselineOnMigrate to true to initialize the schema history table.This basically means that WildFly has noticed that there's already an account table from earlier. The easiest way to deal with this, is by deleting the current PostgreSQL container via the docker rm -f java_ee_postgres command and re-creating it via docker-compose up .
Either redeploying the application or restarting the entire WildFly server should then yield the following log output from Flyway.
INFO [. ] (. ) Creating Schema History table "public"."flyway_schema_history" . INFO [. ] (. ) Current version of schema "public": > INFO [. ] (. ) Migrating schema "public" to version 1 - create account table INFO [. ] (. ) Successfully applied 1 migration to schema "public"This means that, from now on, all database tables within the PostgreSQL public schema will be under management by Flyway. To this end, Flyway has automatically created a flyway_schema_history table which it uses to keep track of which database migration files have already been executed against this database, so it never runs the same migrations twice.
If we wanted to add an extra tos_accepted boolean column to the account table, then all we have to do is add a new database migration file to the same resources folder and redeploy the application to WildFly.
# src/main/resources/db/migration/V2__add_tos_accepted_colunm.sql ALTER TABLE account ADD COLUMN tos_accepted BOOLEAN;Keep in mind, though, that these files aren't supposed to be edited after they've been applied to the database. The Flyway SQL migration files should be thought of as an append-only collection, where the best approach is to roll-forward with a corrective migration if there's ever a typo or logical error in one of your migration files.
Check out the official Flyway docs for more information.
Container Transaction Management
One important difference between EJBs and ordinary Java beans, is that an EJB's public methods are always executed in a transactional context, where the EJB container makes sure that either all of the method's operations succeed, or none of them (where it will roll back if necessary).
Theoretically, this should make it easier to reason about the system, because (again: theoretically) it can never end up in a partial state where one operation has successfully completed, but another operation has not.
Assume we have an EJB like the one below.
@Singleton public class EJB public void someMethod() // Persist a new entity into the database via JPA entityManager.persist(new Account("Jessy", "jessy@example.com")); // Send a message to some queue via JMS jmsProducer.send(queue, "Hello World"); > >An extreme oversimplification of how the EJB container actually invokes someMethod() would be something like this.
try ejb.someMethod(); commit(); > catch (Exception e) rollback(); throw e; >So, what does commit() and rollback() even mean?
Well, that's the part where it starts getting interesting. In the example above, our someMethod() includes a persistence operation towards some relational database via JPA, followed by the sending of some message to a queue via JMS (out of scope for this article).
Both of these external components (the relational database and the JMS broker) already support the concept of transactional operations in and of themselves:
- it's possible to already send a bunch of SQL statements to a relational database, but wait some time before actually committing these statements (and executing them for real)
- it's possible to already prepare a message for some JMS broker's queue, but wait some time before actually committing the message (and sending it for real)
These already-existing mechanisms allow the EJB container to simply hook into them, and provide this commit-or-rollback feature across multiple operations.
For example, if our EJB's someMethod() were to look like this:
public void someMethod() entityManager.persist(new Account("Jessy", "jessy@example.com")); if (1 + 1 == 2) throw new RuntimeException(); > jmsProducer.send(queue, "Hello World"); >Then the EJB container won't ever commit the entityManager 's database operation when the runtime exception is thrown, effectively rolling it back.
And it's important to reiterate that the EJB container can only offer this commit-or-rollback feature for operations against external systems which already support this. Like relational databases and JMS brokers.
If our EJB's someMethod() were to look like this:
public void someMethod() entityManager.persist(new Account("Jessy", "jessy@example.com")); httpClient.send(httpRequest, bodyHandler); jmsProducer.send(queue, "Hello World"); >Then, if the final JMS operation would fail, the EJB container wouldn't be able to rollback the outbound HTTP request, because who knows what has already happened on the receiving end of the HTTP request. The EJB container would still rollback the database operation, though.
The execution of a bean's public methods in a transactional context is enabled by default for all EJBs. In order to disable this feature, the EJB should be decorated with the following class-level annotation.
import javax.ejb.TransactionManagement; import javax.ejb.TransactionManagementType; @TransactionManagement(TransactionManagementType.BEAN)In order to enable this feature for ordinary (CDI) Java beans, they should be decorated with the @javax.transaction.Transactional annotation at the method or class level.
Conclusion
The Java EE framework, with its steep learning curve, is difficult to get started with for newcomers. Not because something's inherently wrong with the technology, but because there's hardly any documentation.
When trying to get things up and running, you'll often find yourself at the mercy of:
- obscure forums like Coderanch
- buried StackOverflow questions and comments without any upvotes
- half-working GitHub example projects, without any mention of the necessary server configuration
So, this article was written with the aim of providing some up-to-date documentation about Java EE 8 and the (JBoss) WildFly 20 application server, together with an actually working example application. I hope you've found it useful.